
Setting Up Oracle SQL Access to Kafka (OSAK): A Non-DBA's Journey
I’ll be the first to admit that I’m not an Oracle Database Administrator. In fact, the little bit I do know is primarily from my limited knowledge of SQL. So, when I had the opportunity to work with the leading enterprise Kafka company to help with bridging Oracle Databases and Kafka, I jumped at the opportunity.
If you’re like me – comfortable with basic SQL but not deep into Oracle database administration – this guide is for you. I’ve documented each step of the process to help you navigate this integration without having to be an Oracle expert.
Understanding OSAK: The Bridge Between Worlds
Oracle SQL Access to Kafka (OSAK) connects traditional databases with Kafka streaming platforms. It allows you to query Kafka streams using regular SQL commands – meaning if you know basic SQL, you can work with streaming data without learning an entirely new skillset.
This integration creates a powerful bridge between structured database tables and real-time event streams, opening up new possibilities for data analysis and processing.
The Architecture
Here’s what we’re building:
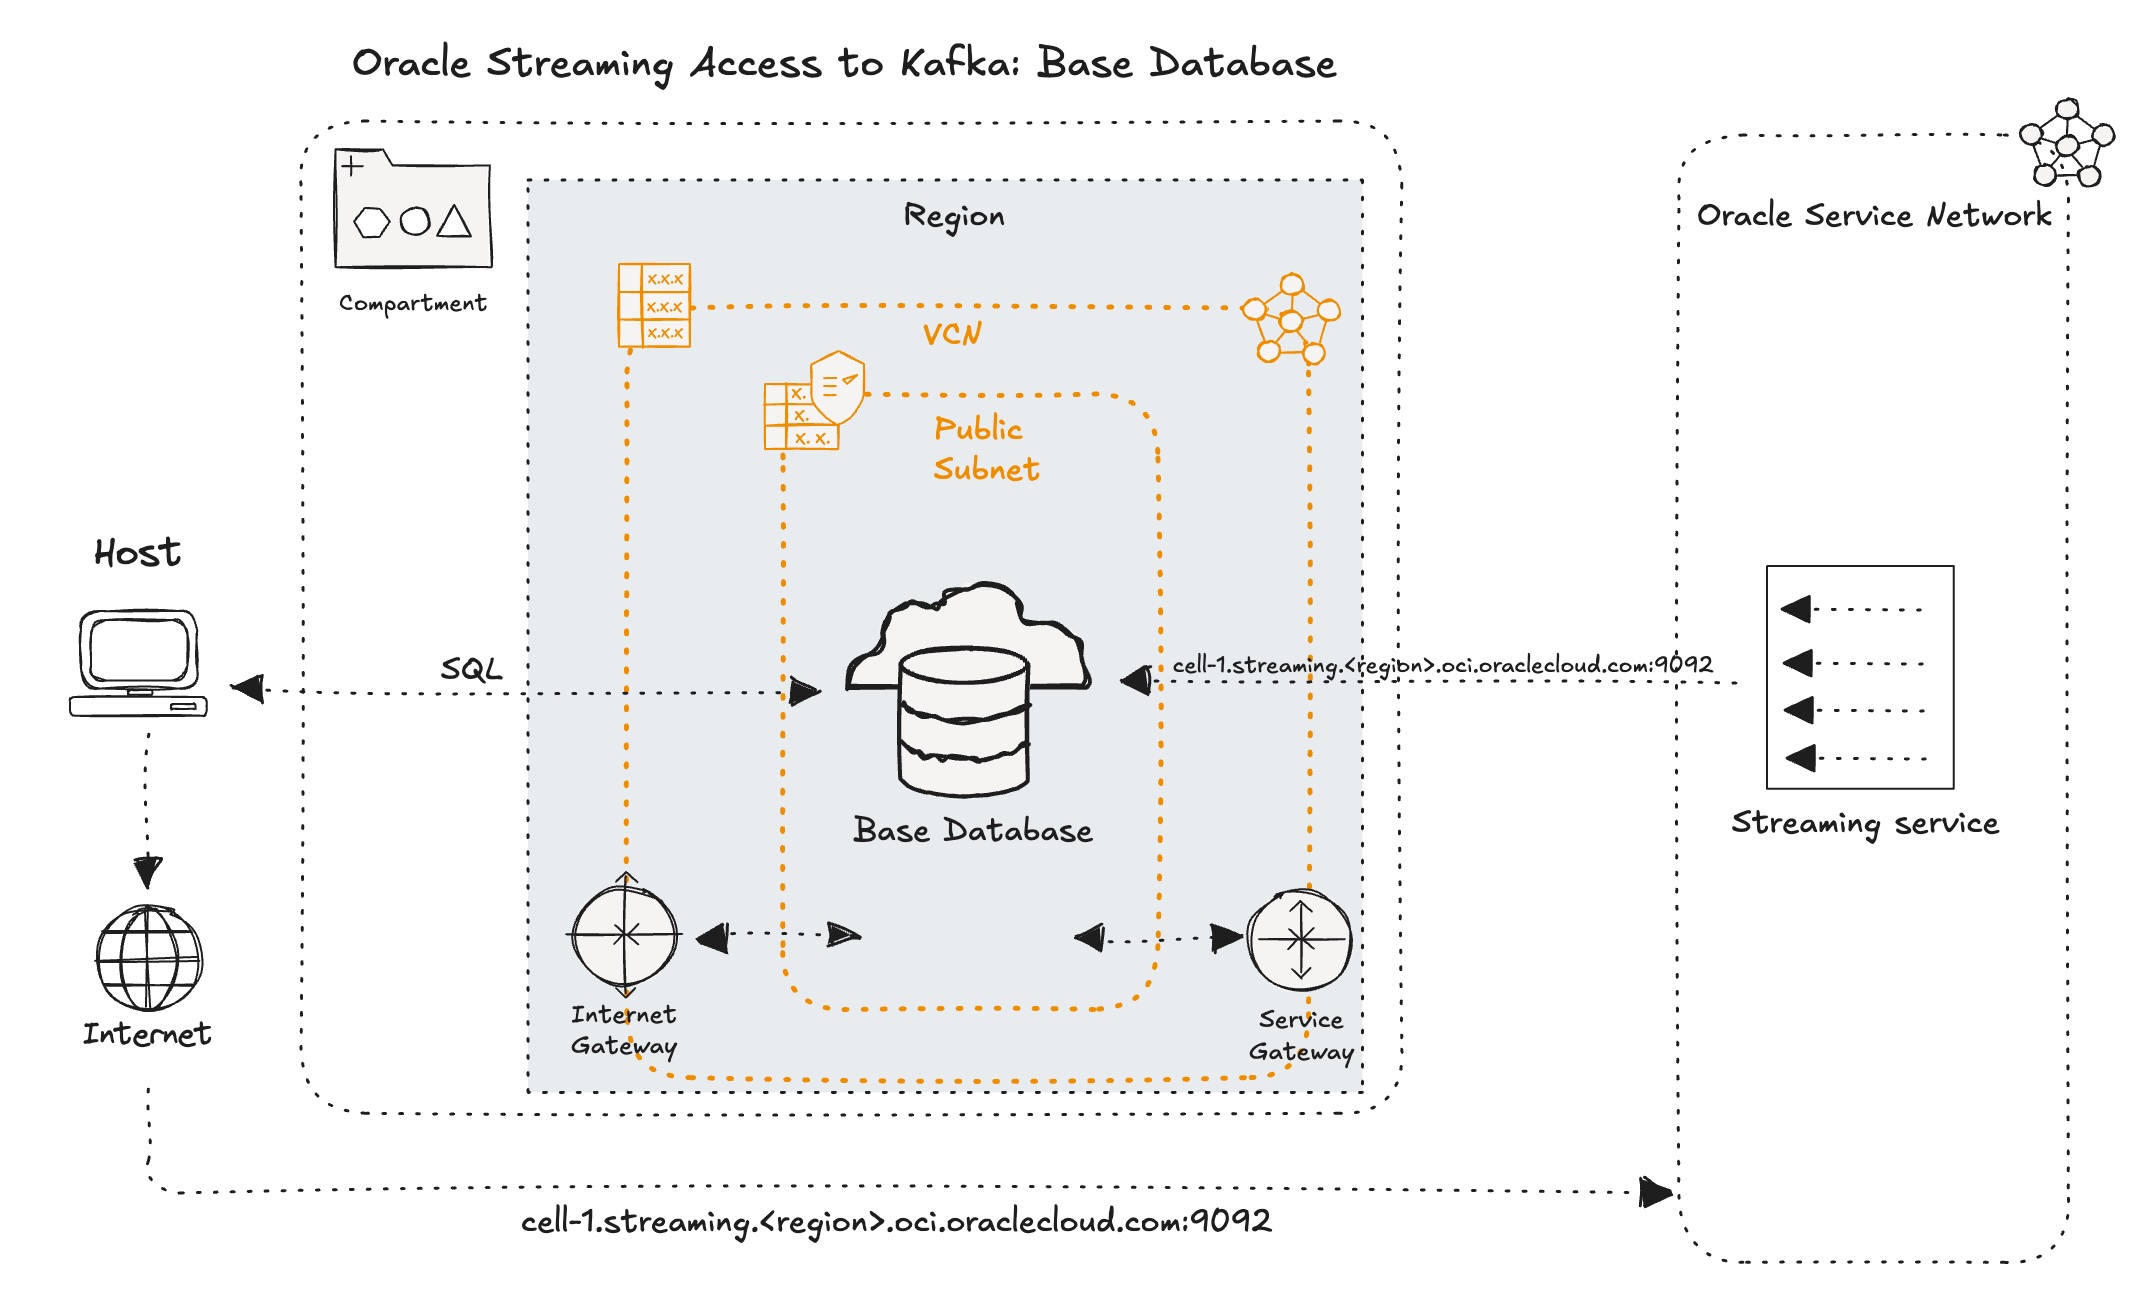
This diagram shows how an Oracle Database connects to OCI Streaming Service through a Service Gateway, allowing SQL queries from client machines to interact with streaming data.
Step One: Setting up OCI networking, policies and streaming service
What you’ll need:
- An OCI account with the necessary resource permissions to create a database
- A public VNC subnet.
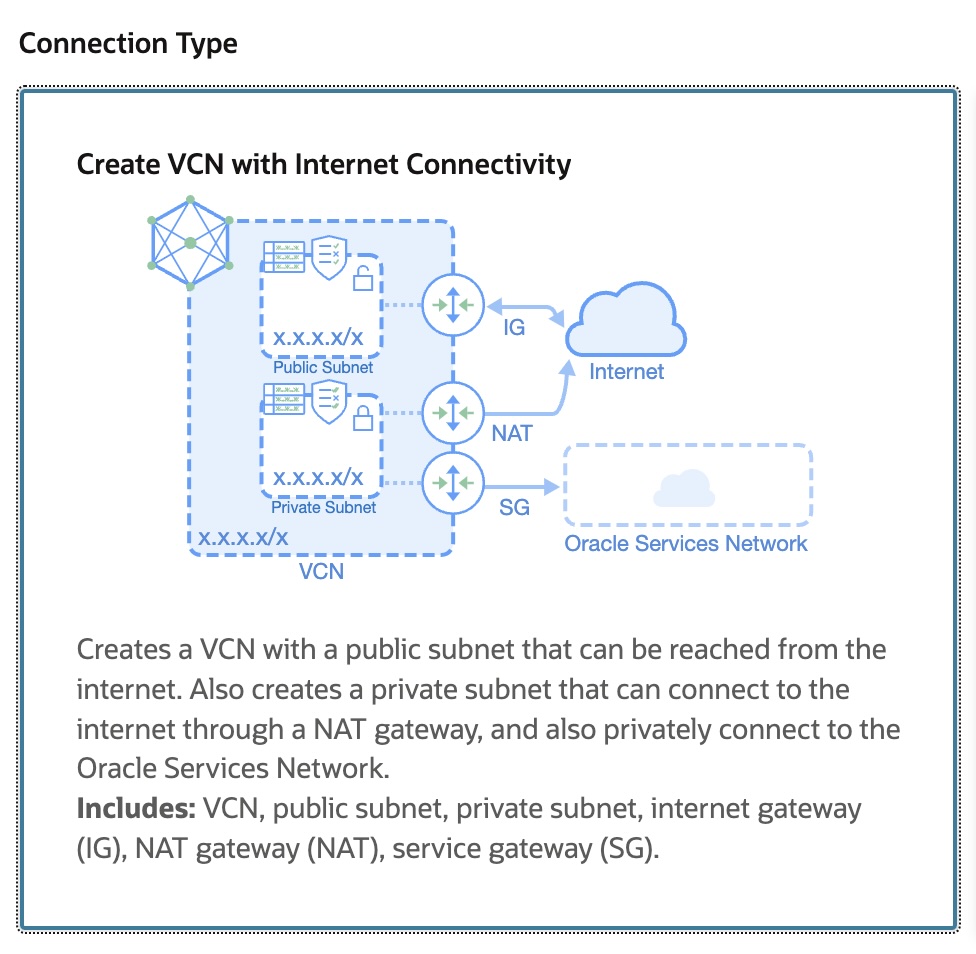
I’d recommend using OCI’s VCN Wizard that walks you through the network setup process. In the OCI console navigate to Networking -> Virtual Cloud Networks. Choose the “Create VNC with Internet Connectivity” connection setup option. The wizard will create a public VCN that can be reachable by the public internet and a private subnet with a NAT gateway, and a Service Gateway to connect to Oracle services.
- Create Ingress Security List to allow port 1521
Now, let’s configure the neccessary polcies to allow for the creation of the OCI streaming service. Take note of the group you’re part of and the compartment you plan to put your resrouces. If you’re not part of the Admin group, the easiest way to check is to navigate to the top right corner of the OCI console and click your profile icon. The ‘My Profile’ page will display your groups your are in.
- In the OCI console navigate to ‘Identity & Security’ then ‘Polices’ under the Identity section. Create the following OCI Policies. For moe information follow the OCI Documentation:
Allow group <group name> to manage streams in compartment <compartment name>
Allow group <group name> to manage stream-push in compartment <compartment name>
Allow group <group name> to manage stream-pull in compartment <compartment name>
Allow group <group name> to manage stream-family in compartment <compartment name>
- Next, create the Oracle Streaming Service.
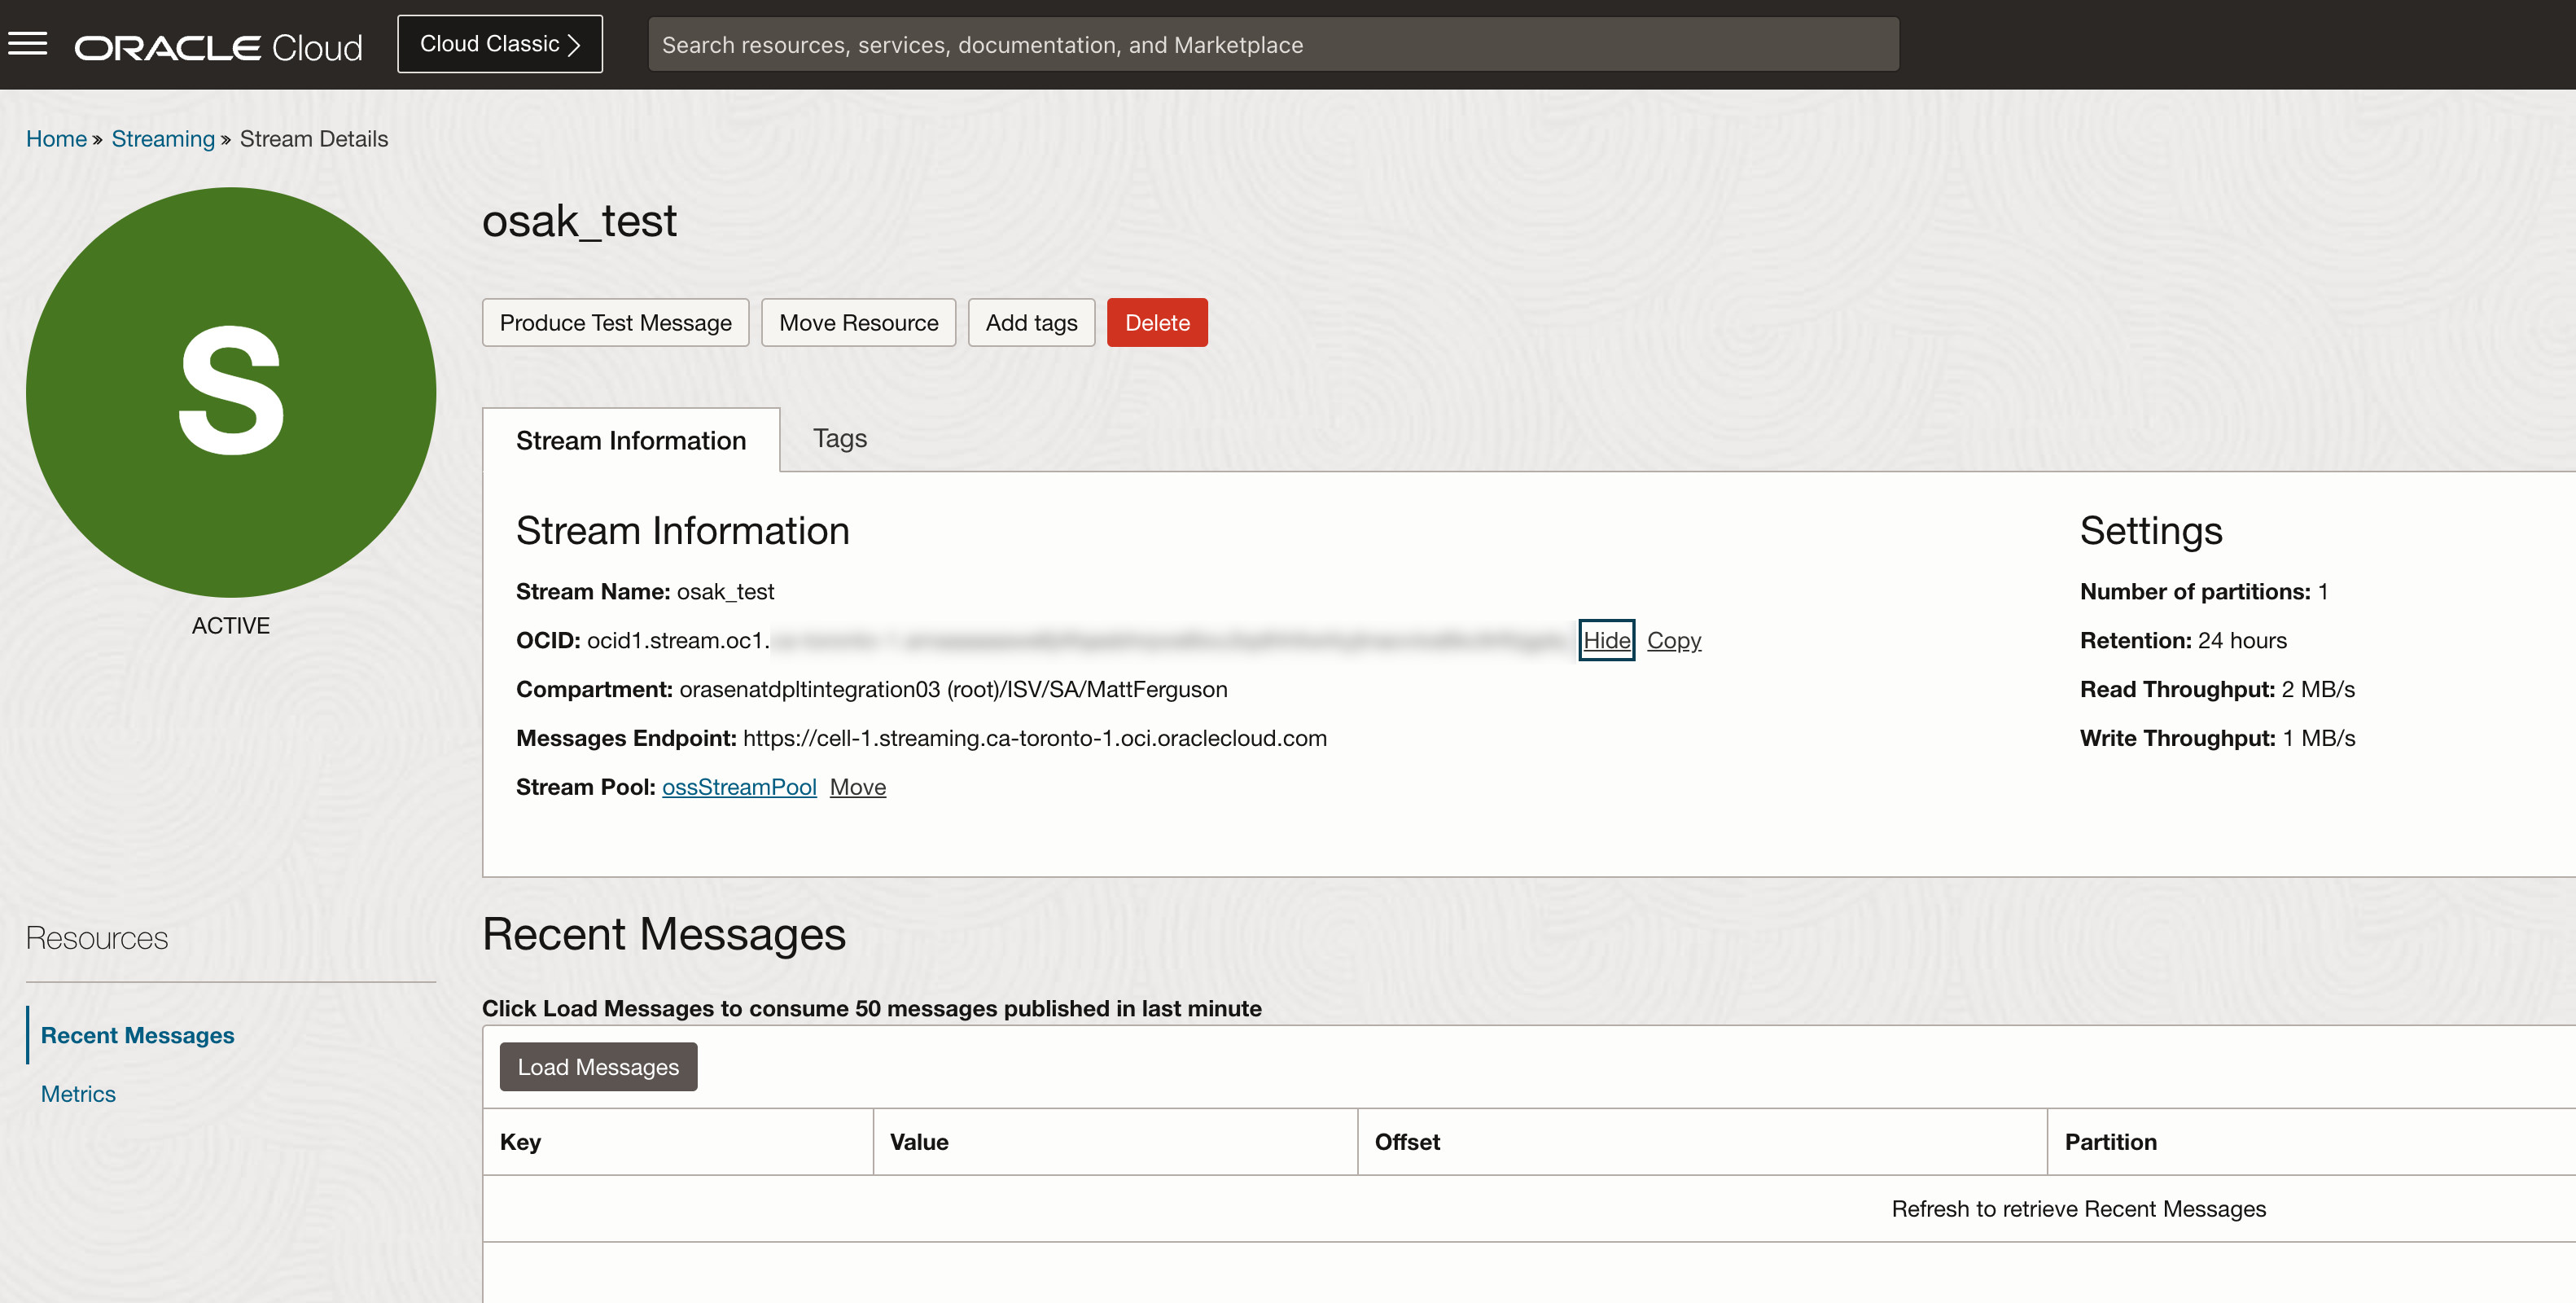
In the OCI console navigage to ‘Analytics & AI’ and then ‘Streaming’. Click ‘Create Stream’. Name the stream osak_testand the stream pool ossStreamPool
Step Two: Database Setup (Two Approaches)
You have two options for setting up your Oracle database:
Option 1: Container-based Approach
For testing or development, a Docker container is the simplest way to get started. Simply create a virtual machine in the public subnet of OCI, connected to it via ssh and issue the following commands:
sudo dnf config-manager --add-repo=https://download.docker.com/linux/centos/docker-ce.repo
sudo dnf install docker-ce
sudo systemctl enable docker.service
sudo systemctl start docker.service

# Create the database container
sudo docker run --name oracledb -p 1521:1521 -e ORACLE_PWD=osakpass1234 container-registry.oracle.com/database/free:latest
With just these commands, you’ll have a fully functional Oracle database running in a container. It’s ideal for testing or if you’re just getting started.
Option 2: Oracle Cloud Database
For production environments, Oracle’s managed database service is more appropriate:
- Navigate to the OCI console and create a database through the user interface
- Configure the networking components (VCNs, subnets, security lists)
Note your database connection details for the next steps
Testing Network Connectivity
- Create an Ingress Security List rule to allow port 1521
- Test connection to the database port:
nc -zv localhost 1521
If needed, disable the firewall on the virtual maching:
sudo systemctl disable firewalld
sudo systemctl stop firewalld
Connecting to the Database
For Container Database
sudo docker exec -it oracledb bash
# Inside the container
sqlplus / as sysdba
For Oracle Base Database
ssh opc@<IP_Address_of_Database_Node>
sudo su - oracle

lsnrctl status
The lsnrctl status command will show available service instances. Look for output like:
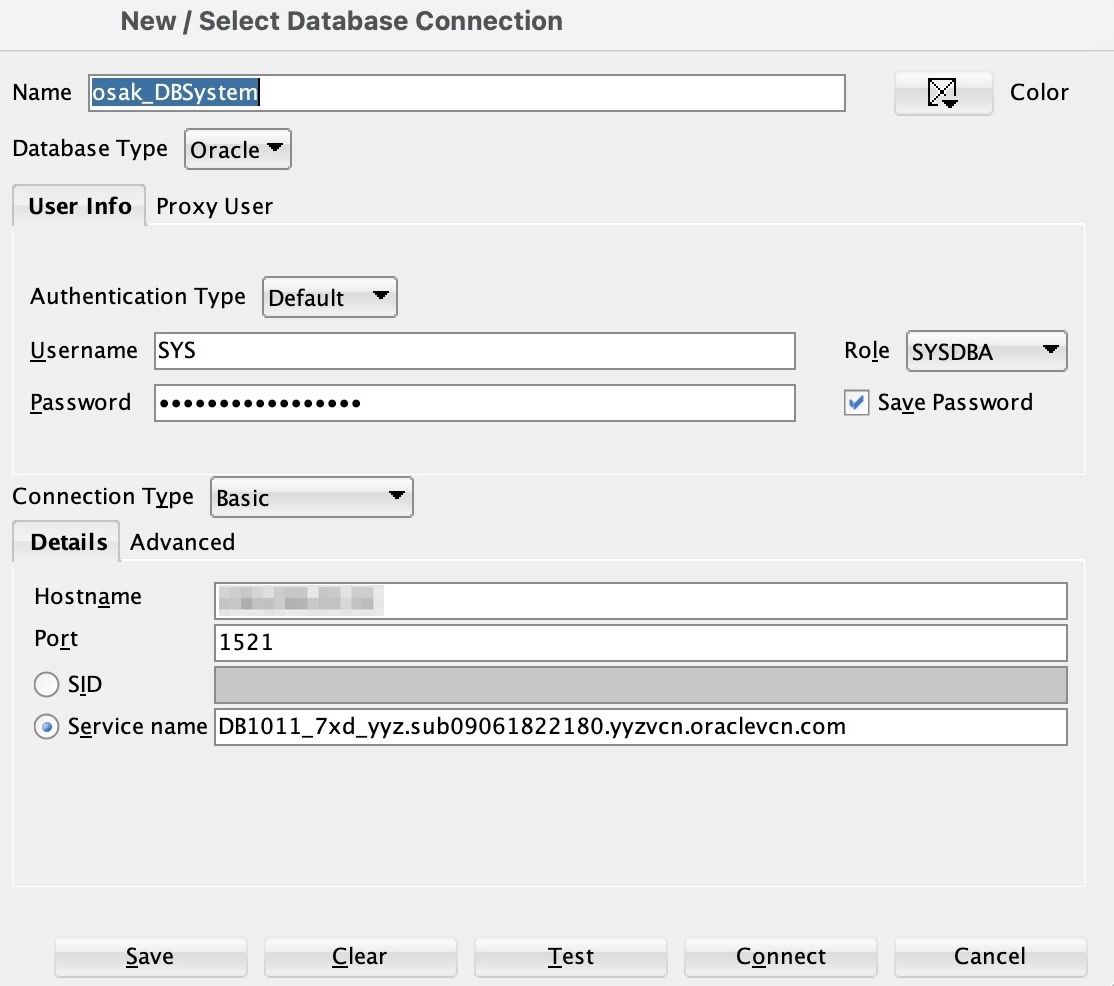
Service “DB1011_7xd_yyz.sub09061822180.yyzvcn.oraclevcn.com” has 1 instance(s). Instance “DB1011”, status READY, has 2 handler(s) for this service…`
To interact with Oracle’s Base Database, you’ll need SQL*Plus:
# Install SQL*Plus client
# Add to shell configuration
export LD_LIBRARY_PATH=/opt/oracle/instantclient_23_3:$LD_LIBRARY_PATH
export PATH=/opt/oracle/instantclient_23_3:$PATH

# Test connection
sqlplus sys/<PASSWORD>@<IP_Address>:1521/DB1011_7xd_yyz.sub09061822180.yyzvcn.oraclevcn.com AS SYSDBA
Once connected, check your database and switch to the appropriate pluggable database:
-- Verify database connection
SELECT name FROM v$database;
SELECT pdb_name FROM cdb_pdbs;

-- Switch to the appropriate PDB
ALTER SESSION SET CONTAINER = FREEPDB1;  -- For Container Database
-- OR
ALTER SESSION SET CONTAINER = DB1011_PDB1;  -- For Oracle Base Database
Creating OSAK User and Configuration
Next, set up a dedicated user for the OSAK operations:
-- Create OSAK user with appropriate permissions
CREATE USER OSAK_USER IDENTIFIED BY OSAK_pass_44;
GRANT DBA TO OSAK_USER;
GRANT CONNECT TO OSAK_USER;
GRANT OSAK_ADMIN_ROLE TO OSAK_USER;
GRANT CREATE SESSION TO OSAK_USER;
EXIT;
Connect as the OSAK user
sqlplus OSAK_USER/OSAK_pass_44@localhost:1521/freepdb1
Great! You’re now create a configuration file for OCI Streaming by creating ‘/home/oracle/osakafka.properties’ with:
security.protocol=SASL_SSL
sasl.mechanism=PLAIN
sasl.username=<tenancy namespace>/oracleidentitycloudservice/<username>/ocid1.streampool.oc1...
max.partition.fetch.bytes=1048576
If using a container, copy the file into it:
docker cp osakafka.properties oracledb:/home/oracle/osakafka.properties
Setting Up the Kafka Integration
Now for the central part of the integration. Run the following SQL commands as the OSAK user.
- Create directories and Credentials:
DROP DIRECTORY OSAK_KAFKA_ACCESS;
DROP DIRECTORY OSAK_KAFKA_CONFIG;
CREATE DIRECTORY OSAK_KAFKA_ACCESS AS '';
CREATE DIRECTORY OSAK_KAFKA_CONFIG AS '/home/oracle';

-- Create credential for Kafka access
BEGIN
  DBMS_CREDENTIAL.CREATE_CREDENTIAL(
    CREDENTIAL_NAME => 'KAFKA1CRED',
    USERNAME => 'FetchedFromFile',
    PASSWORD => '<INSERT_TOKEN>' -- Your OCI authentication token
  );
END;
/
- Moment of trurht: Register the Kafka cluster. Note the information that’s needed from the previous steps.
SELECT
  DBMS_KAFKA_ADM.REGISTER_CLUSTER (
    CLUSTER_NAME => 'OSSCLUSTER',
    BOOTSTRAP_SERVERS => 'cell-1.streaming.<oci-region name>.oci.oraclecloud.com:9092',
    KAFKA_PROVIDER => 'OSS',
    CLUSTER_ACCESS_DIR => 'OSAK_KAFKA_ACCESS',
    CREDENTIAL_NAME => 'KAFKA1CRED',
    CLUSTER_CONFIG_DIR => 'OSAK_KAFKA_CONFIG',
    CLUSTER_DESCRIPTION => 'My test OCI Streaming consumer',
    OPTIONS => NULL
  )
FROM DUAL;
- Check the brokers’ status:
-- Verify connectivity
EXEC SYS.DBMS_OUTPUT.PUT_LINE(SYS.DBMS_KAFKA_ADM.CHECK_CLUSTER('OSSCLUSTER'));
Creating the OSAK Application
Create an application to load data from Kafka to Oracle:
-- Create the load application
DECLARE
  V_OPTIONS VARCHAR2(512);
BEGIN
  V_OPTIONS := '{"fmt" : "JSON"}';
  SYS.DBMS_KAFKA.CREATE_LOAD_APP (
    'OSSCLUSTER',
    'OSSLOADAPP',
    'osak_test',
    V_OPTIONS);
END;
/

-- Create destination table
CREATE TABLE MY_LOADED_DATA(
  "VALUE" VARCHAR2(4000),  -- JSON message storage
  KAFKA_OFFSET NUMBER(38)  -- Offset tracking
);
Testing Your Integration
Now let’s see it in action. Download a utility for producing and consuming test messages on Oracle Cloud Infrastructure’s Streaming Service from here: https://github.com/riceo/oci-streaming-service?tab=readme-ov-file
Follow the instructions to:
- Create a stream in OCI named “osak_test”
- Generate test messages using the OCI Streaming Service utility:
python main.py producer ocid1.stream.oc1.ca-toronto-1.amaaaaaawe6j4fqasbhrpos6... cell-1.streaming.us-ashburn-1.oci.oraclecloud.com
- Download and install SQL Develop tool. Here: https://www.oracle.com/database/sqldeveloper/technologies/download/
Execute the load application to consume messages:
DECLARE
  NUM_ROWS_LOADED INTEGER := 0;
BEGIN
  SYS.DBMS_KAFKA.EXECUTE_LOAD_APP (
    'OSSCLUSTER',
    'OSSLOADAPP',
    'MY_LOADED_DATA',
    NUM_ROWS_LOADED);
  DBMS_OUTPUT.PUT_LINE('Loaded ' || NUM_ROWS_LOADED || ' records.');
END;
/
- Query the loaded data:
SELECT
  JSON_VALUE(VALUE, '$.key'),
  JSON_VALUE(VALUE, '$.ts'),
  KAFKA_OFFSET
FROM
  MY_LOADED_DATA
ORDER BY
  KAFKA_OFFSET DESC
FETCH NEXT 10 ROWS ONLY;
When you see Kafka messages transformed into queryable Oracle rows, you’ll know your integration is working!
Helpful Tips from My Experience
As you work through this setup, here are some things that helped me:
- Take it step by step: Verify each component works before moving to the next
- Keep track of environment details: Connection strings, credentials, and configuration values are easy to mix up
- Test with small data volumes first: Start with a few simple messages before scaling up
- Check permissions carefully: Many issues stem from insufficient permissions
- Save working configurations: Once something works, document it exactly
Troubleshooting Common Issues
If you run into problems, here are some common issues and solutions:
- Connection failures: Verify your networking configuration, especially security lists and service gateways
- Authentication errors: Check that your OCI token is valid and has the right permissions
- Missing privileges: Ensure all required roles (especially OSAK_ADMIN_ROLE) are granted to your user
- Configuration file issues: Verify the format and content of your osakafka.properties file
- For temporary disconnections:
-- To disable during maintenance
EXEC DBMS_KAFKA_ADM.DISABLE_CLUSTER('OSSCLUSTER');

-- To re-enable
EXEC DBMS_KAFKA_ADM.ENABLE_CLUSTER('OSSCLUSTER');
Conclusion
Setting up Oracle SQL Access to Kafka doesn’t require you to be an Oracle DBA expert. With this step-by-step guide, you can successfully bridge your Oracle database and Kafka streams, unlocking powerful new capabilities for real-time data processing.
The integration opens up possibilities for combining historical database records with real-time streaming events – all accessible through familiar SQL syntax. This means your existing database knowledge extends naturally into the streaming world.
I hope this guide helps you on your integration journey. Remember that each step builds on the last, and with patience and attention to detail, you can successfully implement this powerful bridge between database and streaming worlds.
References: